First , I dont say this is the only way . .. but rather the way I did it and the results speak for themselves. Yo ucan use any photo editor, it dosn't have to be PhotoShop 6.0 registered to James Bond Like mine . . .
Notice the Template to the right--not mine but you'll need it.
What You Need . . .
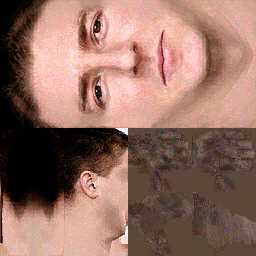
1.) Photo- Try to take the picture head on and face centered in frame. It seems to work the easiest if you do this against a solid surface (white wall). This will help when using PhotoShop Magic Wand Tool.
If you want to look cool, dont take your picture with Sun Glasses because there is an option to add those in the "Edit PLayer" Screen.
2.)I never used PhotoShop before this project but with a little practice it has some handy features. These features greatly aid in the production and placement of the face "skin." With Photoshop you work with layers and ca manipulate them independently or in conjunction with eachother. Also, Photo shop lets you change the transparency of each layer on the fly--see where I'm goinh with this.
3.) You will need the face template . . . download it fom any of the Operation Flashpoint Sites or you can try and on the template to the right -->
|
|
Gettin' Down to Bizness !
OK, you have your picture. You have your template file from a download section and you have your photo editing software. Here is where the fun begins.
1. Open the template file in the IMage editing software.
2. Open your picture as well.
3. Make sure to link all layers in PhotoShop.
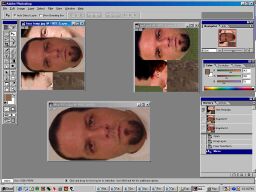
4. In Photoshop rotate the canvas on your "facial" until it corresponds to the positioning of the face being displayed in the "template" which is also open. It takes a little practice wiht photoshop to get used to working with multiple open "image" windows.
5. Here is where PhotoShop shines- select the crop tool. Crop the area surrounding just your face and hit the key. This leaves you with the desired facial area and very little "overage".
6. Use the "Magic Wand" tool and click on any other areas left in your cropped "Facial" that you would like to delete.
7. Very cool Photo shop option-- select move tool and drag your cropped"facial" from its position onto the "window" with the template and it will add you "facial" as its own seperate layer.
8. Play with the transparency until you can see the image on top of the "template" Now you can use the "Free Transform" Tool to position, resize and maneuver until you "facial"image is laying exactly ontop of the template face image like a blanket. When your happy with the results move the transparency slider back to 100% Opaque and you can save the file as face.jpg.
9. Put the file in Operation Flashpoint game directory >Users> "playername" folder
Key Importance- Make sure the eyes and mouth are perfectly super-imposed when you do you layout. If you wnat you model to look right , it will definately take patience and work.
|
|
|